About Me

My photo
Lansing, Michigan, United States
A two-time graduate of Michigan State University. Now a marketing specialist at Cabela's helping others enjoy hunting, fishing and the great outdoors. If you'd like to see a post on a certain subject, feel free to leave a comment requesting it.

Sunday, September 26, 2010

Walk-Back Tune Your Bow

You've done your research and decided on the perfect bow. You drive to the store and pick out the one that was made just for you. If you're like me, you take it home and plan exactly how you'd like it to look. So, what's your first move? Where do you begin and which steps do you take to make sure your new bow is set up to maximize its potential and look great. Well, you've come to the right place.

Before you begin, there are some things you'll need to complete this tutorial:

1) Bow
2) Arrow rest
3) Bow sight
4) Arrows
5) Target
6) String
7) Nut
8) Sticker
9) Any necessary tools to adjust your bow's rest and sight

The first thing to understand about this process is that it's designed to tune YOUR bow to the way YOU shoot. Each of the adjustments you will make to your bow may not be the same as someone else's with a different bow. That's normal. It's about setting your bow to your shooting style to get the best results.

What we are going to look at with this tutorial is how to set the center alignment (left and right position A.K.A. windage) of your arrow rest and bow sight based on the way your bow performs, not the center line of the bow. The first step of completing this process is to attach both your bow sight and arrow rest to your bow. The best way to set the nocking point of your arrow on your bow string is to first affix the arrow rest to your bow, roughly where you want it based on the vane or feather clearance of your riser. In other words, don't set the rest too low so the vanes will hit anything - including cable slide/roller, arrow rest and bow riser. When your rest is locked into position, the use of a bow square will help you identify the position your nocking point will be on your bow string. I personally recommend the use of a D loop to minimize stress on the string and nock, but it's not needed. Next, attach your bow sight to the bow riser. I would recommend setting your sight to align with your eye and the target when you are comfortably at full draw. If you are having to hold your bow uncomfortably to see the target through your sight window, it is probably in the wrong position. A good rule of thumb is to line up your eye, bow string, bow sight and target at full draw with your nose slightly touching the bow string.

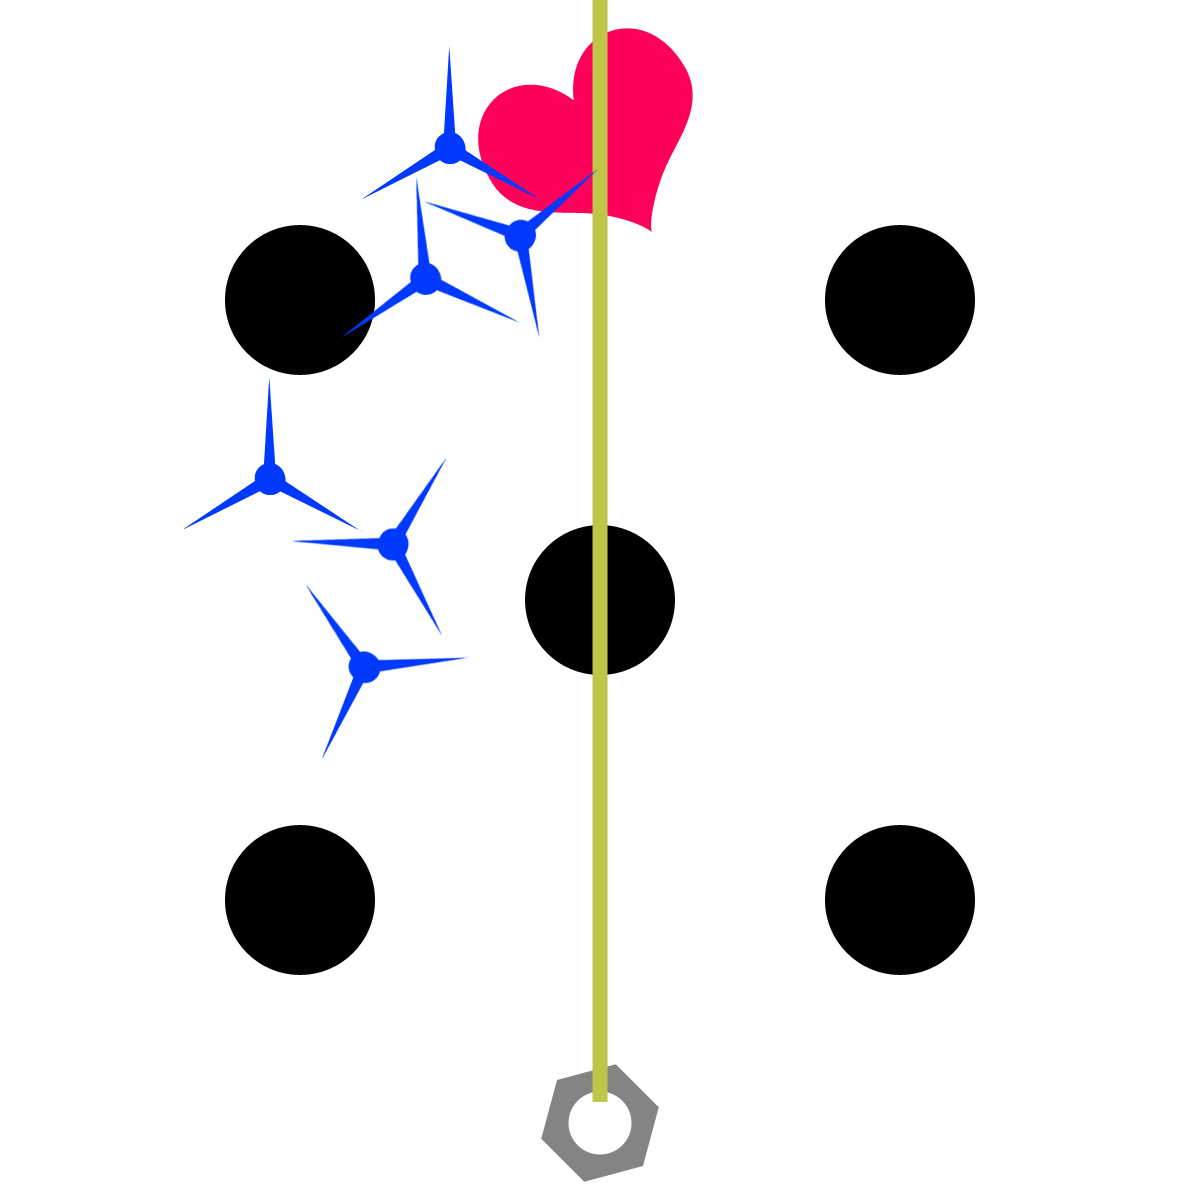
Now that your rest and sight have been attached, you're almost ready to begin the walk-back tuning of your bow. To ensure the success of the process, you will need to give yourself some room to miss the point of aim. You do this by putting a sticker on your target near the top center with extra room on all sides. Below, the heart represents the sticker placement on your target. The heart shot is where you want to aim.


The next step is to tie a nut to the end of a string and hang it on your target so the string splits the heart. Now you're ready to begin.

 
Step back to 20 yards. Fire three arrows at the heart with the 20 yard pin on your sight. Don't be worried if your arrows don't hit where you're aiming. We will go over this later on.


Next, step back to 30 yards and fire three more arrows at the heart using the same 20 yard pin you used to aim with at 20 yards. This group will hit lower on the target because of the added distance and could be to the left or right of the first group.


The final step of this first shooting set is to fire three more arrows at the heart from 40 yards, again using the same 20 yard pin from the first two groups. Your arrows at 40 yards will be lower than both of the previous groups of arrows from 20 and 30 yards.


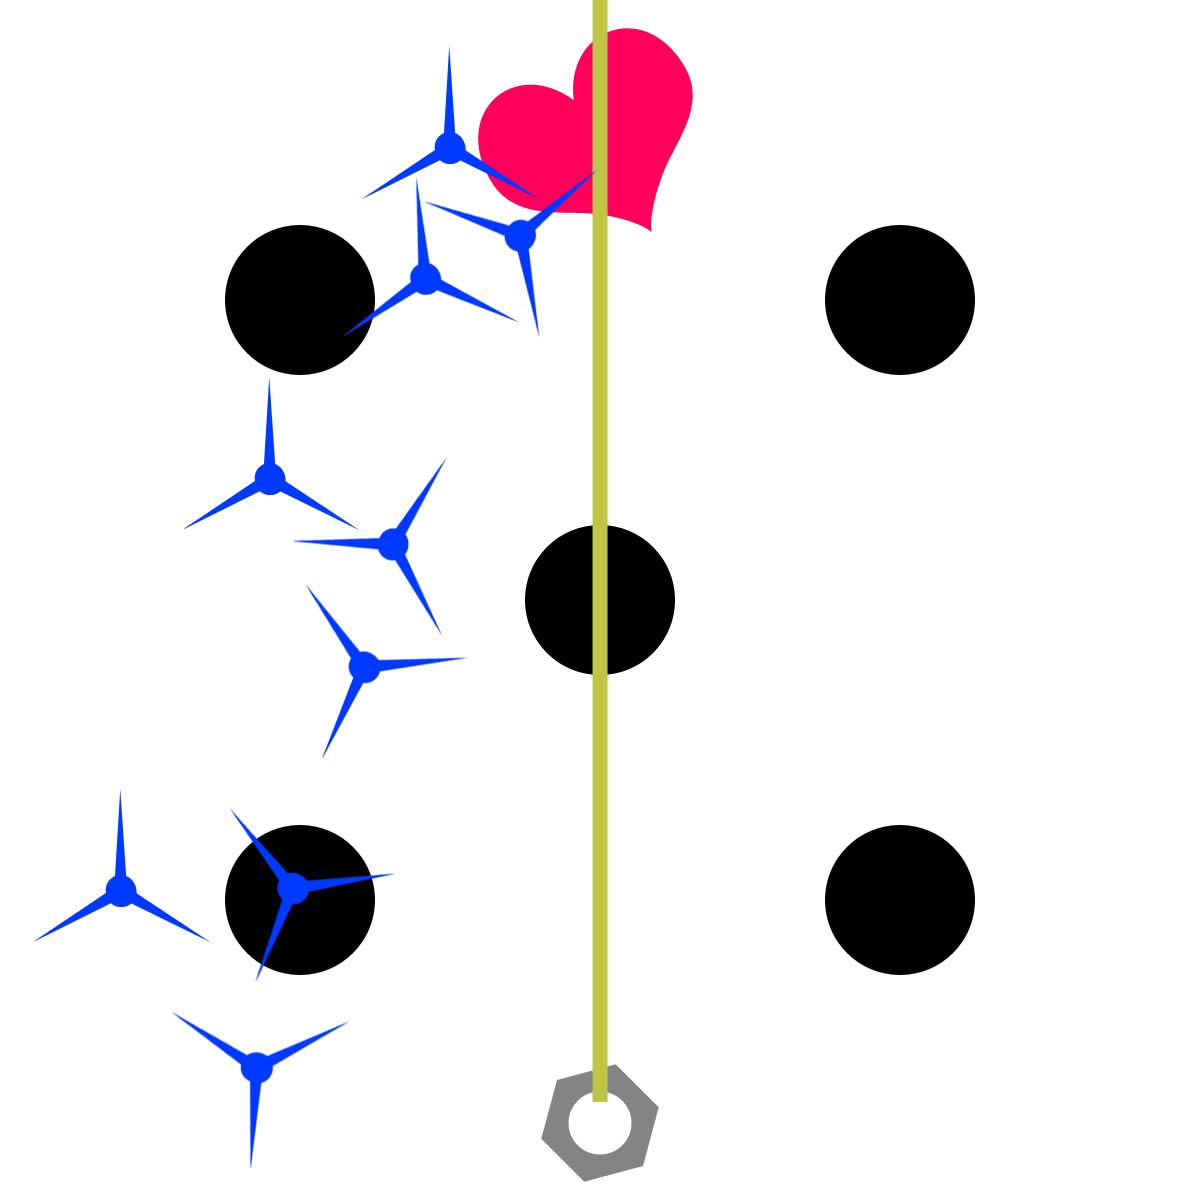
In this situation, your three groups of arrows are shown moving to the left of the point of aim while dropping on the target. This means that your REST needs to be moved to the right of  where it currently is. Move the rest roughly 1/16" to the right and repeat the previous three steps. The desired result is shown below, with the three groups of arrows shot from distances of 20, 30 and 40 yards in a vertical pattern, parallel with the string. Adjust your REST and repeat the shooting process until you have achieved a vertical pattern of arrows. Don't worry if the arrows aren't hitting directly over the string at this point, this will be adjusted with your sight later on. Below is what this vertical pattern should look like.


Once you have achieved the vertical arrow pattern, you can now make the necessary adjustments with your SIGHT to align the arrows in line with the heart. Don't touch your rest after this point! Your rest is where it needs to be. In this situation, we have achieved the solid vertical pattern, but the arrows are hitting to the left of the heart and string. To solve this problem, we need to adjust the SIGHT to the left. Move the SIGHT roughly 1/16" to the left and repeat the shooting steps until you achieve the vertical pattern on top of the heart and string.


If you can consistently shoot this pattern, you are now ready to make the necessary adjustments to the INDIVIDUAL SIGHT PINS to align the groups up or down with the point of aim. At this point you can use the 20 yard pin from 20 yards to shoot your point of aim, the 30 yard pin from 30 yards, the 40 yard pin from 40 yards and so on. Make the necessary adjustments to each yardage pin until your groups are hitting around the center of your point of aim. Below is what your groups should look like once your pins are properly sighted in. The top left bullseye was shot at 20 yards using the 20 yard pin. The bottom right bullseye was shot at 30 yards using the 30 yard pin and finally, the top right bullseye was shot using the 40 yard pin at 40 yards. All of the groups are now "sighted in."


Congratulations, you have successfully walk-back tuned your bow. The placement of your rest and sight should now maximize the potential of your bow's performance. Always remember, you're only as good as your worst shot - so practice, practice, practice!

Thursday, September 23, 2010

The Essentials of Creating Custom Fletched Arrows

With the Michigan bow season approaching, my annual bowhunting equipment check left me wanting to refletch my arrows once again. Having the equipment to do this task myself, I stopped by the local archery shop to pick up a few dozen Blazer vanes and got started. I stripped the old vanes off my arrows and prepared the shafts for the new Blazers. The first couple arrows I finished seemed to be done well, but after about 15 minutes I noticed the front of the vanes were not sticking to the shafts. This really had me confused. I made sure to strip, clean and dry the shafts to perfection, and still the vanes were not bonding. I came to the conclusion that my Goat Tuff glue had reached its expiration date and wasn't usable. This put my project on hold.

Unfortunately, the mid-Michigan supply of Goat Tuff glue didn't exist due to the closeness of bow season. With limited resources, I decided to try a less expensive brand of glue to see if I could get the same results as when using my normal adhesive. What a mistake. Using a lower quality glue is an eye-opening experience after using a high performance glue, such as Goat Tuff. I was able to pull the vanes off my newly-fletched arrows a full day after using the new glue. It was obvious that I needed to get my hands on a new bottle of Goat Tuff.

I managed to acquire a new bottle after making a number of phone calls to the area archery shops and was again ready to fletch. The new bottle of Goat Tuff worked wonderfully as I fletched through the bulk of my arrows. The bonds were solid and professional - more than strong enough to withstand a good pull. I started thinking about all the vanes I have put on my arrows over the years. More importantly, I reflected on the process I went through trying to figure out the best way to achieve optimal results when fletching my arrows at home. Many of the teaching aids and instructions available to consumers show you what to do, but provide minimal explanation of the reasoning behind each of the steps. Knowing this, I decided to make my own videos explaining the steps I take, from pooling the knowledge I've picked up along the way, to help all the hunters and archers that may be new to the world of fletching their own arrows. Below is what I consider to be the best technique for creating quality custom-fletched arrows. I truly hope these videos will do two things - save you time, and prevent the headaches associated with having vanes fall off during use.


Saturday, September 18, 2010

Prepare Yourself for Predators

It's been a while since the last update to the blog so I thought I would write something that many hunters don't necessarily want to hear about this time of year - predators on their property.

I've been bow hunting a 120-acre piece of land in Michigan for the past four years and have noticed that the number of fawns on this farm is much lower than what I've seen in other areas.  The obvious reason for this is that there must be less does giving birth compared to the other farms, right?  I would like to think that's the case in this instance, but unfortunately my trail cameras have been showing me another possible cause for the problem.

Because game monitoring has become an essential part of strategic bow hunting, I purchased two Cuddeback Capture trail cameras last spring and have been using them regularly ever since.  I've 'captured' some great shots of whitetail bucks and tom turkeys over the last two years, which - to me - makes the purchases worth while.  But like I said, these cameras also pick up activity that hunters may not be too fond of.  I've found that the property I've been hunting holds much more than deer and turkeys.  Coyotes, red fox, gray fox and the occasional mink are all predatory animals that feed on the young of both deer and turkeys - and to my surprise, they're all on the property.  Below are some pictures I've collected of these predators over the past two years of game monitoring.


So the next time your scratch your head and wonder why your game numbers aren't growing, consider the not-so-obvious answer.  Just because you don't see predators on your property doesn't mean they aren't there.

Predator hunting can affect successful whitetail and turkey management the same as normal conservation efforts.  Keep that in mind the next time you're in the field and decide to pass on that coyote because you don't want to mess up your deer or turkey hunt.  Taking that predator off your property could have long-lasting positive effects on the local deer and turkey population in your area.

Thursday, August 12, 2010

Michigan Whitetail Madness

It’s now August and the itch to get back in the woods is slowly setting in.  Earlier in the week I made a trip to the property I have been hunting on for the past couple of years to see what my trail cameras had produced.  To my surprise the weeds in front of my cameras had grown up to nearly chest height.  I figured there would be a very limited number of photos because of the thicket that had overgrown the area.  I was wrong.  The trail was still being used daily and the cameras had even captured a few young bucks.  One in particular I recognized instantly from last year.  I found this deer’s left shed within the first five minutes of this season’s shed hunt and was pleased to see what he had grown into.  The good news is he's now showing great potential for being a possible shooter buck in the future.  He’s a two-and-a-half-year-old with a solid eight point frame.  It’s a shame the weeds were blocking most of his body and rack in the first few photos I have of him this year, but this picture shows his head gear pretty well.


To be completely honest, after a rough season last year, hanging multiple sets and having no luck with the heavy hunting pressure, my motivation was lower than normal this spring.  What really hurt was the deer I had been after last season was tragically struck by a neighbor’s truck and died during deer season.  Three weeks into bow season I bumped into another hunter that informed me of the accident.  Having such a great deer lose his life during his prime is a sad situation, and it really impacts your drive as a hunter.  I learned that first hand. 

Last summer I was fortunate enough to get this great early season velvet photo of the deer, which preceded another great shot of him moving between fields after dark. 


This deer really tested my patience.  I hadn’t seen him during daylight hours, but I thought if I kept up my intensity I could possibly get a shot at him during the rut.  I guess that’s all you really have in the end, because some things you just cannot control.


Even with the bad news, I stuck with the area because I knew there were other decent deer on the property.  Near the end of the season I had this two-and-a-half show up in front of my camera.  I had never gotten any photos of this deer, nor seen him, so it was a great highlight to the end of my deer season.


I call this buck Striker because of his perfect 10 point frame.  My cameras also snapped this photo just after the close of the deer season which was great because it showed he managed to make it through gun season.


Hopefully he will hang around the area for the upcoming early season this year and give me a shot.  I can’t wait to finally see him in person or get a photo to see what he has to offer this year.  He is definitely on my hit list, and I’ve got my fingers crossed that everything works out.  I'm a believer that good things come to those who wait.  I guess we'll see.

Tuesday, June 22, 2010

A Gentle Giant

If someone would have told me a year ago that I would be teaching a puppy the difference between speak and whisper while doing homework, I would have laughed.  To my surprise, that is exactly what I have been doing.  On June 2, 2010, a tank of a black lab puppy - now named Jack - came into our lives.

Today was one day after his fourteenth week birthday, or at least that's what we were calling it.  Nearly three weeks ago, Jack was waiting for us on one of our random trips to Gander Mountain.  On that day, the only thing on my shopping list was a turkey mount - I thought.  As you may have read in my last post, I successfully filled my spring turkey tag earlier in the year.  I wanted to buy a mount that would match the other fans on my wall, and the only store near us that had one in stock was in Flint.  Because we didn't have other obligations that evening, my girlfriend and I decided to take the 45 minute trip to pick up the mount and get out of the house.  When we pulled up in front of the store, I saw that something was waiting for us.  As we walked up, our hearts melted as there were three lab puppies sitting in a shopping cart looking for new homes - two black and one golden.  After a few moments, two of the puppies were on their way to starting a new life with two nice families.  While talking with the owner, and petting the last black pup, we were informed that there were actually two labs left.  The owner said there was another puppy in the back of his truck, and that he was giant.  We walked to the truck and discovered a handsome black lab puppy with monster paws and a big bark.  The owner's daughter pulled him from the crate and set him in the cart with his brother.  After a side-by-side comparison of the two, it was obvious that the puppy from the truck was going to be much larger than the others.

We talked for nearly an hour, getting a brief history of the owner and his dogs.  It didn't take long for us to decide that the time was right to finally get the puppy we had been wanting.  Now came the hard part - trying to pick between the two.  As we looked the puppies over, trying to get an idea of their personality and disposition, the giant from the truck proceeded to place the weight of his head in my hands and gleam up at me.  I picked him up out of the cart to take a better look, and he took it a step further by resting his head on my shoulder.  At that moment, I realized I had blindly stumbled upon the dog I had been waiting for.  It just seemed right, plain and simple.  All the fear of buying a dog seemed to vanish in the blink of an eye.  It was all down hill after that.

Three weeks and eight pounds later, and I couldn't be happier with our choice.  Jack is very well behaved and is great with other people and dogs.  We're still working on the cats - they don't seem to want to play with him as much as he does with them.  He weighed a little less than 29 pounds when we brought him home and is now topping out at nearly 37.  My girlfriend and I are having a hard time picturing what he's going to look like when fully grown.  We've narrowed it down to something roughly the size of a horse.  As for his intelligence, all the rumors are true.  He is very smart and already knows sit, stay, come, down, up, shake, bang bang, speak and will ring a bell when he needs to use the little boy's room.  I'm sure he'll have whisper down by tomorrow night - if not sooner.

If you're thinking of getting a dog, do yourself and the dog a favor by doing your research. Make sure the breed you choose is right for your lifestyle and theirs.  Take your time in deciding, and be aware that they are a lot of work.  You will need to put in a huge amount of time to help them learn what is acceptable behavior, so plan for that.  If you can provide what the puppy - or dog - needs, it will be a great experience.

Tuesday, June 15, 2010

2010 Michigan Spring Turkey Hunt

Earlier this year my girlfriend and I decided we would try to take a couple of tom turkeys with our bows.  For me, this was my first attempt at shooting a turkey with a bow.  I had called turkeys into decoys well within range for a bow in the past so I figured it would be a piece of cake with a pop-up ground blind.  We scouted the property we would be hunting and knew there were several nice sized birds in the area.  In early April there was a group of three mature longbeards that seemed to be hanging out close to our trail cameras, and with a little luck, we managed to get some nice trail pictures of them.  This really had us excited for the start of our season.

When opening day arrived, the weather forecast was solid rain for the remainder of the first week, and with classes and other obligations, we made the choice to stay out all day.  Unfortunately, we realized the birds were not roosted in the woodlot we were set up in.  The morning produced nothing but hens and jakes, but we were determined to stick it out and give the toms some time to move. In the early afternoon, we left the blind for a much needed lunch break.  To our surprise, when we returned, we made a big mistake.  The three toms were no more than 50 yards from the blind moving through the field.  After a few moments, they actually made their way toward the tree line and walked off into the woods.  We quickly ran to the blind and started calling.  About 15 minutes into our calling sequence the toms returned to the field, but hung just out of bow range.  16 hours after we first entered the blind, our first day of hunting was over with two unfilled turkey tags.

To make a long story short, two weeks had passed out of our three week season and neither one of us could coax a tom close enough to kill with a bow.  Being the late season, well after their breeding period, this is not an uncommon occurrence.  I knew the season would be tough, but this year had been brutal.  Even so, we managed to keep our spirits up and enjoy the time we spent in the woods.

I made the decision to personally change weapons and switch to the shotgun for the last week.  I had a couple of encounters during the first two weeks with gobblers well within gun range and had been unable to fill my tag with the bow.  Knowing that these birds had already been exposed to my calling and didn't bite, I switched tactics and made a conscious effort to leave the woods early to locate and roost this group of toms.


Late into the hunt, I found the flock - who had recruited a forth longbeard - on another piece of property I had permission to hunt.  I watched the birds roost and planned my setup for the following morning.  The field layout was such that they only had one real place to land.  I made the choice to sit on the edge of the field where they had flown up the night before.  Even though my cover was bad and the sun was in my face, I knew the birds would fly down on either side of me because of the long grass surrounding their roost, which was directly behind me and the tree I was sitting against.  I made it to the base of the tree well before daylight and prepared for their departure.  Almost immediately after the sun began to light up the sky the birds sounded off.  My plan was looking good.  I waited to hear the unmistakable sound of a turkey leaving the roost, and when I did, my heart began to race.  One by one, I watched the toms land 40 yards to my left.  They had landed in the exact spot where they had flown to roost the night before.  Now my only problem was waiting for the group to spread out and allow me a shot. 

I had my sights set on the dominant bird, who appeared to be much larger and have a notably whiter head than the others.  As he strutted behind the group, it seemed like an eternity - when in reality it was probably only a few minutes.  After considering taking one of the smaller birds on the outside of the group, a shot presented itself.  With only mere feet between the birds, and being confident in my choke tube and the yardage, I lined up my sight and squeezed the trigger.  As the thundering boom of my shotgun rolled across the fields, my 2010 spring turkey tag had been filled before the sun had a chance to rise above the trees.

I learned a lot about myself as a hunter this spring, but even more about myself as a boyfriend and mentor.  I found the same enjoyment being in the woods with my girlfriend - sharing experiences and making memories - as I did taking this beautiful Michigan tom turkey. It goes to show, you never know what you'll find in the woods.